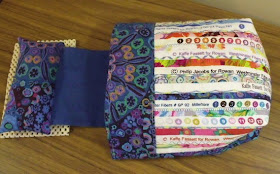
I'm collecting Kaffe Fasset fabric to make an Indian Orange Peel quilt by Karen Stone in November. A group of us from our local quilt guild are going to take a class. I washed and pressed all the lovely colors and trimmed the selvages off. I decided to make a special Handy Snippet catcher out of these lovely selvages :-). How's that for a high class way of collecting garage eh? Here are the selvages sewn onto a foundation:
The thread catcher inside and pin cushion:
The outside:
The finished project!
This blog is intended as a bulletin board to show the quilts I've been making on my vintage and treadle sewing machines. My husband and I collect antique and vintage sewing machines and I use them to make all my quilts. Here are some of the results.
Wednesday, 25 August 2010
Tuesday, 24 August 2010
Iron carrying bag
What do you do with a hot iron at the end of a workshop or retreat? I've been intending to make a bag to carry my warm iron home at the end of the day for years! I finally sat down today to do it. The iron that I take to retreats is a small one that I bought at Walmart for $7.77. I think the brand is Durabrand? It even has steam! For that price, I figured I could get a few of them LOL. I bought some of that ironing board cover fabric to re-cover a small ironing board and had half of it leftover. I cut out a rectangle 13" x 28" and made a 'box' out it by forming the box bottoms to make a 6" bottom after sewing the side seams.
I then made a little pouch for the plastic water container out of the heat resistant fabric so it can be added to the bag as well :-).
The outer bag with the lime green floral fabric is cut 5" longer than the lining. Press under 1" on the top edges. Sew side seams, leaving top 2" open and hem the openings. Sew the side seams and form the box bottoms as the lining.
Turn the lining wrong side out and tuck it into the bag which is turned right sides out. Fold the the top over the lining and sew, forming a casing. I used wide seam binding for the drawstring. Voila, no more worrying about taking a warm iron home in the car!
Here is the iron in the bag with the water container tucked beside it. I had a strip of the heat resistant fabric left so I wrapped it around the cord to protect it from the heat as well.
Saturday, 21 August 2010
....and why I continue to sew on old machines :-)
One of my quilter friends wanted her 'little old sewing machine' serviced this week. We were thrilled to discover an almost pristine little Singer Featherweight 222K, which is the later version of the 221 that has the removable tray. Once Jake got it serviced, cleaned and oiled, I got to test it :-). I'm working on assembling an "I spy" quilt for my granddaughter who is going to JK in September. At first the thread kept breaking and after getting a replacement bobbin case base (there was a burr on the original), she sewed like a dream! Isn't she pretty?
Sewing the I spy quilt on the machine:
It even has a throatplate marked with 1/4" seams!
Here it is with the bed removed. These machines are great for sewing tiny doll clothes!
A bright red plastic tray at the side of the case for holding bobbins and other sewing supplies.
It is loaded with the original attachments including a beautiful manual, darning foot, hoop and attachments in an original bright red vinyl case. The very first vintage machine we ever bought was a Singer 222k with this identical red vinyl case. I bought it for the ruffler not realizing that it was such a collectible little machine. I paid a whopping $15.00 for it 12 or 13 years ago. It is the machine that got us into collecting antique and vintage sewing machines.
I just looked up the serial number of this machine ER901772 and it is one of a batch of 2500 commissioned by Singer on September 7, 1960. It looks like it's the fourth last batch of the 222's made.
Wednesday, 18 August 2010
...why I sew on old machines
Gail and I got together yesterday morning to work on our braids for the local hospital's chemo unit. We are paired up with another member of the Elgin Piecemaker's Quilt Guild and we decide what we're going to do and then work on the project together. It's a great way to get to know another member of the group better and we accomplish something useful :-). Here are the braid pieces, all cut out and ready to sew:
I sewed the braids on my trusty Singer 15-88 treadle sewing machine. Have I mentioned lately that I LOVE this machine? :-)
Yesterday, we trimmed the braids and sewed the pairs together and got started on the sashings and borders. Trimming was a great job to do together! I had to test a Featherweight that my husband had cleaned and serviced, so I "killed two birds with one stone" and did something productive while test sewing. This little Featherweight was made in 1934!! It purrs along so nicely and was a joy to stitch on!! While looking up some of the history of this older Featherweight in Nancy Johnson-Srebro's excellent book "Featherweight 221 - The Perfect Portable", I came across this paragraph:
"It's hard to believe some of the Featherweights purring away in sewing rooms and class are now old enough to qualify for social security, but there they are - proud of their Depression era birthdates and not only alive, but thriving. And they look as modern today as when Singer shipped them from its Edison, New Jersey, factory to a cautious public ready for the 1933 World's Fair.
"The Featherweight will probably never be reproduced as we know it. Even with today's advanced technology - investment casting of parts, and CNC (Computer Numeric Control) machining operations - the design and hand fitting involved in assembling this intricate, finely-crafted portable sewing machine would likely boost its unit cost too highly. This reality just reinforces its status as a classic; an example of craftsmanship that's fast disappearing in this modern world of plastics and throw-aways. This alone makes the Model 221 well worth owning whether you are a quilter, seamstress, or a collector of fine things that will probably be no more."
p. 131
....and that's why I sew on these wonderful old machines :-).
Check out the stack of 2" squares that I was using as leaders/enders while sewing the sashings and borders onto my quilt :-):
The quilt top is actually square :-)...I was not exactly in the center when taking the photo..hey, I'm a quilter, not a photographer LOL.
I sewed the braids on my trusty Singer 15-88 treadle sewing machine. Have I mentioned lately that I LOVE this machine? :-)
Yesterday, we trimmed the braids and sewed the pairs together and got started on the sashings and borders. Trimming was a great job to do together! I had to test a Featherweight that my husband had cleaned and serviced, so I "killed two birds with one stone" and did something productive while test sewing. This little Featherweight was made in 1934!! It purrs along so nicely and was a joy to stitch on!! While looking up some of the history of this older Featherweight in Nancy Johnson-Srebro's excellent book "Featherweight 221 - The Perfect Portable", I came across this paragraph:
"It's hard to believe some of the Featherweights purring away in sewing rooms and class are now old enough to qualify for social security, but there they are - proud of their Depression era birthdates and not only alive, but thriving. And they look as modern today as when Singer shipped them from its Edison, New Jersey, factory to a cautious public ready for the 1933 World's Fair.
"The Featherweight will probably never be reproduced as we know it. Even with today's advanced technology - investment casting of parts, and CNC (Computer Numeric Control) machining operations - the design and hand fitting involved in assembling this intricate, finely-crafted portable sewing machine would likely boost its unit cost too highly. This reality just reinforces its status as a classic; an example of craftsmanship that's fast disappearing in this modern world of plastics and throw-aways. This alone makes the Model 221 well worth owning whether you are a quilter, seamstress, or a collector of fine things that will probably be no more."
p. 131
....and that's why I sew on these wonderful old machines :-).
Check out the stack of 2" squares that I was using as leaders/enders while sewing the sashings and borders onto my quilt :-):
And, here is the finished quilt top (the colours are a little off in this photo...the border is a blue with brownish/plum motifs):
The quilt top is actually square :-)...I was not exactly in the center when taking the photo..hey, I'm a quilter, not a photographer LOL.
Sunday, 15 August 2010
Quilts of Gees Bend
On Thursday, 7 of us met at the London Convention Center for a quilt show put on by Cotton by Post about the Quilts of Gees Bend. This was a very different show from the usual Quilt show that we attend. We all attended the lecture in the afternoon which explained the history and context. We thoroughly enjoyed the show and lecture and have decided to do a small challenge project "in the spirit of Gees Bend". We hope to meet at the end of October to unveil our finished projects. Check back to the blog around that time to see what we all come up with :-). Here is the whole group that attended the show:
Lynn, Yellie, Jackie, Amy, Jacqui (me), Susan and Gail:
Some of the quilts on display at the show:
Gail and Amy:
Monday, 2 August 2010
...home again! New sewing machine :-)
We are home again after a two week vacation in Ottawa. We antiqued and visited every quilt shop we came across :-). I will post a picture of some of the lovely fabrics I got when I get them ironed. We also found a few sewing machines to add to the archives, but they still have to be cleaned up. We were in an antique shop in a small town somewhere between Peterborough and Ottawa where I found this cute little treasure. It's a Limoges miniature sewing machine. We found this in a delightful shop with all kinds of nooks and crannies run by a little old lady. We had a delightful chat with her and this one came home to live with me :-).
It has found a little spot in our corner mirrored shelf (a yard sale find from last year). It looks quite at home there.