For my daughter and daughters in law, I made these microwave corn and potato bags for Christmas. They were fun to make and are great to use. It is essential that you use 100% cotton fabric, cotton batting without scrim and cotton thread to avoid fires in your microwave! Here are the corn bags:
These were simple to make, just a long rectangle with an overlap at the top:
The potato bags were more work. They are lined halfway inside with potato fabric as well. I had a fat quarter of chili pepper fabric and with some creative cutting and piecing, managed to get a round one for myself to heat tortilla shells in the microwave. It's supposed to keep the shells warm at the table too:
Here is one of the potato bags with the flap opened up:
The pattern is by Legacy Patterns and called "Baked Potato & Tortilla Steamer". They also have a pattern for the corn steamer, but I did not like the way it was put together. This is the corn steamer made with the pattern. It is made in one big finished rectangle and then the sides are folded up and top stitched. However, the lining shows through at the sides which I didn't like. So, a couple of my friends and I put together the other version...much less fiddle fussing and looks finished.
This blog is intended as a bulletin board to show the quilts I've been making on my vintage and treadle sewing machines. My husband and I collect antique and vintage sewing machines and I use them to make all my quilts. Here are some of the results.
Thursday, 30 December 2010
Doll clothes for Kara, Lauren and Leah
This year it was Kara's turn to get a doll bed, quilt and diaper bag from Grandma. She turned 3 in October and I gave her the doll last year. I was running out of time (I got finished at 1:30 Christmas Eve and the party was starting at 3:00 :-). I dug through my drawer of 2" strips and chose pinks and greens and yellows and sewed them to the batting and backing "quilt as you go" style. Pink binding around the quilt and it's finished!
This is the back of the quilt:
A sleep sack for Kara's baby. Lauren and Leah got one of these 2 years ago, so now all their dollies are matching:
The doll bed and quilt:
Diaper bag with fitted cloth diapers, plastic toy lotions, powders, spoon, fork, etc.
The rest of the diaper bag goodies:
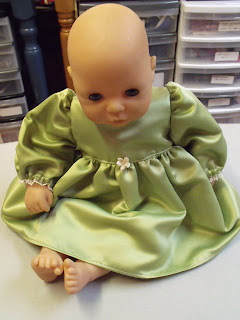
Granddaughter Lauren is 6 and got her baby three years ago already. But which Mommy doesn't like a new party dress for her baby eh? The fabric was leftover from my niece's bridesmaids' dresses:
Leah (4) got a dark green velvet dress for her baby:
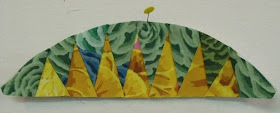
...a few more arcs
Finally made a couple more arcs for my Indian Orange Peel class homework...lots to go!! But, at least we're making progress. Now that Christmas sewing is finished, I can concentrate on keeping these moving. We are getting together with a bunch of us to work on them together; we need a support group :-).
Tuesday, 14 December 2010
Pillowcases
Last week, Chris, Gail and I got together and made pillowcases for the million pillowcase challenge. Gail brought her serger and we had a regular sweat shop going! In one morning, we made 16 pillowcases. Gail brought them to Christmas care on the way home and they were happy to receive them.
Here's Gail keeping the serger moving right along:
Keep pushing 'em through there, Gail :-)
Chris and I kept the iron and rotary cutters humming and also sewed the band onto the pillowcases before Gail got them to finish the side seams. We used the 'rolled' band method so all seams were enclosed at the top. I call that method the 'sausage' method since the top looks like a sausage when it's all rolled inside. You could hear regular comments about sausages being ready to sew around the sewing room LOL
Here is a partial pile of the ones we had ready at that point:
My husband was home due to a snow day so he took a picture of us with all the finished pillowcases. Gail had made one at home already so we had a total of 17 pillowcases. Gail registered them on the million pillowcase site and has the number on her blog post. There are now 214,739 in total...long ways to go for the million, but everyone bring us closer!
Friday, 3 December 2010
Indian Orange Peel (part 3)
Working away at the sorting of colours and cutting strips and 4 patches in between other activities. I cut out 5" squares for the 4 patches out of my new fabrics.
Here I've added the 8 four patches that I sewed earlier in the week. I need 25 in total, so we're getting there :-). Hope to sew a few arcs yet this week just to keep some progress going in there.
Wednesday, 1 December 2010
Indian Orange Peel (Part 2)
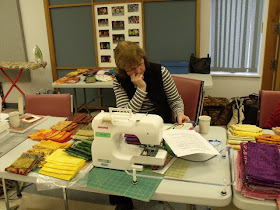
Most of the class (see previous post) was spent learning about colour and practising sorting fabrics. We each sorted our own fabrics and then, as a group, we went around to each person's stash and Heather analyzed the choices and showed what would happen if we added different colours. We also made up a shopping list of what we needed to buy to supplement our fabrics. Most of us had lots of medium value fabrics, but lacked in the light department and needed more dark darks! But, we did get a little bit of sewing in. Here is my first arc....only 100 more to make before March 19th when we have our next class!!
We also made one four patch block. I finished a few more this week out of the Kaffe Fasset fabrics I had on hand:
I spent some time this week sorting out all my fabrics into the 12 categories of the colour wheel and adding possibilities from my own stash to the mix. In order to keep my sanity, I put them into a large ziplock bag and labelled them. Imagine my delight when I opened my drawer for a marker to find 10 different coloured markers all colours of the rainbow LOL. I could match up 10 of the 12 to the colours in the bag! How fun is that eh?
This morning, Gail and I went on a little shopping trip to find some more Kaffe Fasset fabrics. There is the cutest little quilt shop on Richmond Street in London called Hyggeligt. From the website: "Hyggeligt (rhymes with google it) Danish in origin, a sense of feeling welcomed, loved and content with friends, family and your own world. No literal translation but it does sound like a nice place to be." It definitely was a VERY nice place to be this morning :-). I got to spread out all my baggies of fabric and play with colour to my heart's content with the help of Gail and the shop owner, Chantal. Now doesn't this just make you want to sit down and sew?
I'll keep you posted on progress.
Oh oh! I started a new project!!
On Saturday, the Elgin Piecemakers, plus friends, got together for a class with Heather Stewart to make the Indian Orange Peel quilt by Karen Stone. You can see a picture of the quilt we are making on Kathy's blog. Heather uses this quilt to teach a lot of colour theory. We learned all about the colour wheel and had a lot of fun arranging our fabrics into cool and warm colours, lights and darks and mediums and learning from fellow quilters' colour choices. I definitely dreamed in colour on Saturday night :-).
I chose Kaffe Fasset fabrics to make my quilt. I was thinking of using solids and prints, but Heather advised me not to do that as there is too much contrast for this particular pattern. I had not purchased too many fabrics yet wanting to see if I could get away with the solids first. This was a good decision :-).
Our first task was to sort our fabrics into colours according to the 12 categories in the colour wheel. Then we had to sort those piles from lights to darks. Here are my fabrics in the process of being sorted:
Here are some of the other girls sorting through their fabrics. You can see the intense concentration on all their faces :-).
Unfortunately, I did not get pictures of everyone that was in the class. We were just too busy to remember to take pictures :-). You can see more pictures on Gail's blog as well.
Friday, 19 November 2010
{Stubborn} Determined Dutchman's Puzzle!
Jake serviced a little Featherweight for a fellow Quilt guild member tonight and I had to give it a little test run. I decided to make my block for the Elgin Piecemaker's guild meeting for next week. We all agreed to make a red and white block. They will be assembled into a quilt to donate to the chemo unit at the local hospital. I browsed through a magazine of quilt blocks and came upon Dutchman's puzzle which I thought appropriate because of my Dutch heritage!! As I was assembling the four double flying geese units together, I realized that this was a 10" block, not a 12" one!! Too stubborn to start over, I added a strip around the block and now it's a Stubborn Dutchman's block. See Gail's block on her blog.
Gail posted a comment that said 'stubborn' has negative connotations and I should use 'determined' instead. I like that!! I will change it to Determined Dutchman's Puzzle!! LOL
Thursday, 18 November 2010
Playing with Mini's.......
About 15 years ago, I made a diamond log cabin Christmas tree skirt and taught a class eventually to a few friends. The original instructions were on my old computer that was stolen. I didn't really want to make a whole new sample at this point so my brilliant husband suggested making a mini version since I love making miniatures. What a brainstorm!
Here is a photo of the original tree skirt:
Go ahead and ask why on earth I would put the dark side to the inside and the lighter side on the outside? There is a reason for that!! The carpet in our old house was very nice and thick and great for all the teenagers that would descend on our house at that time! However, it was that lovely 80's rust colour! I wanted to minimize the clash with the red so I put that side further under the tree :-). It does still bug me!! However, I do still put it under my tree each year!
Here is a photo of the diamonds for the mini tree skirt to be sewn together. The logs are 1/2" finished. I have a small tree so I'm hoping this will be a perfect little tree skirt for it :-)
I also made half diamond triangles, using Marci Baker's method and ruler and I'm hoping that they'll fit properly to made this one a hexagon shape. I'll keep you posted when I sew them together :-).
Here is a photo of the original tree skirt:
Go ahead and ask why on earth I would put the dark side to the inside and the lighter side on the outside? There is a reason for that!! The carpet in our old house was very nice and thick and great for all the teenagers that would descend on our house at that time! However, it was that lovely 80's rust colour! I wanted to minimize the clash with the red so I put that side further under the tree :-). It does still bug me!! However, I do still put it under my tree each year!
Here is a photo of the diamonds for the mini tree skirt to be sewn together. The logs are 1/2" finished. I have a small tree so I'm hoping this will be a perfect little tree skirt for it :-)
I also made half diamond triangles, using Marci Baker's method and ruler and I'm hoping that they'll fit properly to made this one a hexagon shape. I'll keep you posted when I sew them together :-).
Sunday, 14 November 2010
Leah's I spy quilt
Finally doing a blog post on the I spy quilt I made for my granddaughter, Leah, who started JK this year! First she came over to my house and chose the 4 1/2" blocks from my stash that she wanted to include in her quilt.
She had to stand on a sewing machine bench to reach for the top :-)
Hmmm....what else should we include?
I think this wall is getting a little full!
After all that hard work designing, a snack is in order:
The colours are little better in this closeup. I quilted funky flowers on the squares and leaves in the border.
Here is Leah trying out the quilt for size:
...and posing with her finished quilt:
Lauren got her quilt out too and we took a picture of her in front of her quilt as well:
Josh wanted to get in on the action too :-). This is the quilt I made for him when he was born and he took that one to school for his JK quilt:
This is the I spy quilt I made for Josh when he turned 1 year old. He was too young really as these squares are more generic for a young child, not necessarily things he really likes. It was fun to make them when they were older as they could help pick out the ones they liked best:
She had to stand on a sewing machine bench to reach for the top :-)
Hmmm....what else should we include?
I think this wall is getting a little full!
After all that hard work designing, a snack is in order:
The finished quilt (the colours are a little bit washed out because of the light coming into the studio):
The colours are little better in this closeup. I quilted funky flowers on the squares and leaves in the border.
Here is Leah trying out the quilt for size:
...and posing with her finished quilt:
Lauren got her quilt out too and we took a picture of her in front of her quilt as well:
Josh wanted to get in on the action too :-). This is the quilt I made for him when he was born and he took that one to school for his JK quilt:
This is the I spy quilt I made for Josh when he turned 1 year old. He was too young really as these squares are more generic for a young child, not necessarily things he really likes. It was fun to make them when they were older as they could help pick out the ones they liked best: