Saturday, 29 December 2012

....couldn't resist a new project :-)

I've always wanted to do a Bonnie Hunter Mystery quilt....her site has inspired me to be more organized, use my leftovers and introduced me to usable leaders/enders.  When she posted on her blog and face book page that this one would be smaller than the previous projects and posted the colours, I jumped in with a couple friends from my Quilt guild.  It is called "Easy Street". 

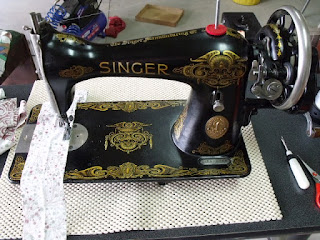
We had a great time raiding our stashes and drawers of scraps and pre cut strips and buying a few new FQ's and trading black on white 2" strips.  I got a little behind during the two weeks before Christmas as I was finishing Christmas gifts, but this week has been very relaxed and my husband has been restoring some more sewing machines and, of course, I need to try them out :-).  As of this morning, I'm all caught up!  Here's the little Featherweight machine that I got to try out...it's a 1955 version and has the marked throatplate for 1/4" seams and more modern decals.  It sews like a little champ.


 It has a few scratches and small chips in the paint, but overall a pretty machine:


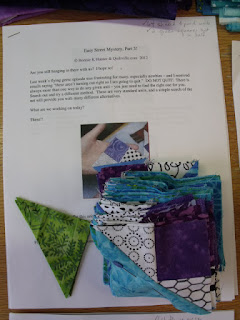
All the units done for 6 steps and the fabrics in the back:


Part 1 - four patches


Part 2 - flying geese - and cut bricks


Part 3 - shaded 4 patches and cut two green squares :-)


Part 4 - more flying geese and cut green squares


Part 5 - sitting turkeys


Part 6 bricks and cut green triangles


Looking forward to next week's clue!  I'm enjoying this mystery very much.  While doing the "sitting turkey" blocks, I saved the cut offs and will use them as leaders/enders to make half square triangles.  Wonder what I can do with those :-)


Back to working on UFO's :-)

Tuesday, 11 December 2012

Jenn and Dietrich's Quilt

This quilt has been finished for quite a long time, but we wanted to connect and visit with Jenn and Dietrich to bring the quilt, which was not finished on time for their June wedding.  I did get it completed in July, but with our schedules, we finally had a chance to have that lovely coffee visit last Friday evening.  We enjoyed seeing their home, chatting and having yummy apple crisp done in the crockpot.

I used the same pattern, Split Decision, that I used for another wedding quilt in black and white, but added purple to it.  Jenn painted one wall in her living room a lovely light Easter Egg mauvy colour. I raided my 2 1/2" drawer and retrieved all the leftover blacks and whites that I used for the other quilt and added any purples that I could find.  There are even Kaffe Fassett fabrics in here :-).   The final layout of the blocks:

  
The finished quilt:


 I took a workshop with Elaine Quehl in May, though the London Friendship Quilt Guild and stretched myself on free motion quilting and decided to get brave and try some swirly flowers on this quilt.  I was very happy with the way it turned out:


I was very excited to find this lovely dark purple backing in the sale bin at a local fabric shop :-).  The binding and the quilting on the back:


I think this is a pattern that I will use often!! (Click on the photos for a larger view.)

Monday, 26 November 2012

It's finished!

I finished the binding on the table runner and am very happy with how it turned out.  It's a bit of a pain to sew the binding on, but worth it. You can also trim the edges straight for a quick finish :-).


Closeup of the binding:


 Here it is on my kitchen table:


Thursday, 15 November 2012

Giving 'organic quilting' a try

I put together a simple table runner with tumbler shapes awhile ago and have had it hanging on my design wall all this time because I didn't know how to quilt it.  Suddenly, I remembered seeing a blog post on organic quilting.  Fortunately, I found it back and decided to give it a try. I really love how it turned out!


Close up of the wavy line quilting


I will definitely try this again on other runners or quilts.  I am stitching the binding on and will post another photo when it's all finished.

Tuesday, 13 November 2012

Selvage Quilt Finished!

I finally got my "Glass Tumbling Blocks" quilt finished from the book "Quilts from the Selvage Edge" by Karen Griska.  I finished on time to enter it into the London Friendship Quilt Guild's show in October.  Nothing like a deadline to get things done :-).  

Here is the finished quilt hanging in the show:


It's a little hard to see the quilting, but I did a swirly design with a variegated King Tut thread in the orange sections and straight lines through the cubes and the selvage border.  I'm thinking of adding two more rows of straight quilting to the selvage border, but am waffling :-)


Here is the straight line quilting in the cubes...hard to see on the photos as well:


The finished quilt ready to hang on my sewing room wall:


I can't remember if I ever posted pictures of the top I made for my sewing machine bench using selvages:
 

I used a different embroidery stitch on my vintage Bernina 830 for each strip and made the mistake of switching colours each time!!  I really got to memorize the threading sequence for that machine :-)
 

This bench matches my curved front Singer cabinet which houses my Singer 403.


 What's next???  I still have LOTS of selvages piled up.  Better think of a new project to use some of them up :-)


Monday, 5 November 2012

....and the top is finished!!

I finished putting together the top of the Bordered Diamonds quilt!  Nice to get that off the wall and done so I don't have another UFO.  I hope to quilt it soon, but that probably won't happen til after Christmas.  The grandkids will need some doll clothes and quilts for their doll beds first :-).   It was a bit of a challenge sewing these diamond blocks together, but I pinned them carefully and it worked quite well.

The instructions in the book were to cut some of the diamonds in half in the length and the width for the edge pieces and one in four for the outside corners.  I was suspicious that they wouldn't fit and waffled over it, but finally decided to cut anyway and they do fit on the sides, but I will lose the points of the diamonds along the edges.   But, the corners did not fit at all.  So, I used those cut diamonds as a template and added an inch or so on both sides and re sewed strips to them.  The corners fit properly now.  I posted a question on face book about the pattern and the lady that wrote up the instructions in the book (Liza Roos Lucy)  indicated that she did plan it that way to be a bit more frugal and have more flexibility moving the pieces around.  Since it was such a busy quilt, she didn't think the lack of points would be noticed :-).  Her motto is "perfection is the enemy of finished".  I love that!!  It reminds me of the Dear Jane quilt motto...."finished is better than perfect". 

I am very happy with this quilt and it will remind me of the wonderful time in the class with Kaffe Fassett and Brandon Mably.  Now on to working on the Indian Orange Peel quilt again...oh and making doll quilts :-).

Friday, 2 November 2012

Bordered Diamonds progress

I've actually been doing a fair bit of stitching and quilting and hope to post a few finished quilts as soon as I have a chance to take pictures.  I've had company for the last several weeks and we had a great time visiting and even sewing together.  I made good progress on the Kaffe Fasset quilt and have the layout done.  Here it is on my design wall:

The colours are a bit off due to light steaming in from the window at the side.  I am now sewing the rows together.

Saturday, 6 October 2012

Kaffe Fasset Class

This past week, I had a wonderful opportunity to take a class on Bordered Diamonds with Kaffe Fassett and Brandon Mably..  The workshop was organized by Chantal Lynch of Hyggeligt Quilt shop in London (Ontario).  When I first discovered Kaffe's use of colour, I have been in love!  I have collected many fabrics over the years and am working on the Indian Orange Peel using a lot of his fabrics and also have done lots of small projects.  When Chantal mentioned that she was hoping to get them to London, I started dreaming of taking that workshop.  I was very excited to get into the Bordered Diamonds class.

What a great time we had.  We worked very hard and I have muscle pain in my legs to prove it LOL!  There was no sewing involved at all...just get it up on the wall and play around til your diamonds glowed!  Here I am working on the bottom of the design wall:


 This is as far as I got in the class.  There is still work to be done on many of the diamonds and I need to add more at the sides and bottom.  The borders will be sewn onto the diamonds and then arranged to balance the colours out.  What fun moving the diamonds all around til you found just the right one.  Kaffe would come around and make suggestions, move a diamond or two and Brandon would follow in awhile and move it again :-)!  It is amazing how different those diamonds look depending on the colour and print around it.  We truly had a fabulous time playing with colour.


At the end of the class, Kaffe came around to each person's wall and showed what worked and what didn't.  These comments were very helpful and I learned a lot with that exercise.


That evening I sewed the borders around one diamond that I knew was going to stay just to see how it would look.  Last night, my two sisters were over for a visit and while they were making ipad covers and mug rugs, I transferred all my diamonds and borders from the flannel wall to my own design wall.  It looks totally different in my sewing room with the different light.   I also sewed two more diamonds together. 


My neighbour had a great layout with lots of polka dots!!   So inspiring working beside her...have I mentioned lately that I love polka dots? :-)


My friend Deb's lovely blues and purples:

This photo shows several of the design walls along the back row:


Tuesday, 28 August 2012

Cute little sewing table...

A friend of mine wanted to get rid of this cute little sewing table so I decided to give it a loving home for now and see if it can be useful with my herd of antique and vintage sewing machines.  Isn't it the cutest little table?

 I tried a Pfaff machine that I have here, but the free arm is too wide.  This Bernina 707 mini matic fits very nicely, except I have to find something thin to raise it just slightly.  It has a nice large surface to piece quilt blocks on and a handy lower edge for your pin cushion, thread catcher, scissors, etc.  I think I'll like this table...now to get the machine fixed so it'll sew.  It has a few issues, but my trusty resident sewing machine repair guy could get it working again, I'm sure :-).  It also folds flat so it will store conveniently in a corner.

Monday, 6 August 2012

Remember the Indian Orange Peel?

What is this that stirs up long forgotten, distant memories? :-)

Ah yes, it is the Indian Orange Peel!! 


Reading my friend Kathy's blog this morning, I was inspired to share progress on my Indian Orange Peel quilt.  Kathy breaks up a lot of her projects into little tidbits of progress, which is inspiring me to work on my UFO's and get organized (again!).  I started to piece my center blocks together in June and aimed to do at least three or four per week.  We went on holidays in between and haven't gotten back to it, but this morning I decided to put a block together before venturing into more organizing.

Here is the whole layout on my guest bed pinned to a tablecloth:

I have one complete row sewn together and the second one ready to piece.  Then I can get the first two rows sewn together as well.

My goal is to finish putting together the whole center of the quilt by the end of the summer and then cut strips for the border sections.  I have to choose colours carefully to flow into the borders.  Once I have the strips cut and pinned to each paper piecing unit, I can grab a couple and paper piece in between other projects.  Meanwhile, I'm audtioning fabrics in anticipation of taking the Diamond Borders Class with Kaffe Fassett himself (!) in October.  I will have plenty of leftovers to do the diamond quilt.

Have I mentioned lately that I LOVE Kaffe Fasset fabrics? :-)


Friday, 3 August 2012

It's that time of the year......

I've been sewing in the garage again testing sewing machines that Jake has been fixing up.  I love that as I 'have' to help my husband and this is a great excuse to sew LOL!!  We put the cars out in the driveway for the summer and the garage has turned into a sewing machine workshop!  Here is my worktable and Jake's in the back.  I also had an ironing station set up.  It was nice and cool in the garage and we had the door open enjoying the outdoors and the neighbours who waved or stopped to chat.  Ah summer!

The first machine I tested was a Singer 127 handcrank machine that is going to Haiti.  This machine has some heritage marks and wear on it, but still sews a beautiful stitch.  I worked on a delectable mountain border for my Oh Canada table topper (that didn't get finished on time for Canada Day, but it will be for next year :-).

 Just check out the stitch quality of this machine....

Left is the top stitching and on
     the right is the bobbin stitch. This is why I love the dedicated straight stitch machines...no dog leg stitches, but nice and straight :-).


In between, I polished up all these sewing machine benches that had accumulated in my sewing room.  They fit under tables so nicely that I didn't realize I had 15 of them.  Most of these have gone on to other homes now.

The next machine I got to try was a Singer 28 handcrank.  It is 3/4 the size of the above machine. This one is also destined for Haiti.  It sews very nicely too and I sewed a lot of mountains with that machine. 


 Doesn't she have lovely decals?

 The cool thing is that it is made in Great Britain, but marked in French...wonder if it was originally sold in Quebec?
This lovely machine is a Singer model 115 with the Gold wing decals.  It is a unique machine and has a full rotary hook which makes it a very smooth machine.  

 It also sews a very nice stitch:

 Aren't the decals stunning on this machine?

 This is the endplate!   They really knew how to make things beautiful in the early 1900's :-).  Wasn't it William Morris that said, "Never have anything in your house that isn't useful or beautiful?"  No plain old white sewing machine for me LOL.


 Next up was a Singer 201 which is destined for a treadle cabinet.  I used a hand crank attachment to try it out. This is also a rotary machine with a drop in bobbin and sews very smoothly and quietly.


 Another lovely stitch! (Click on the photo for a closer view)

 Last, but not least, was a lovely two tone Singer 301.  These are the big sisters (or brothers :-) of the Featherweights and have the same bobbin system.  They are aluminum machines making them quite light weight and have a carry handle on top so they are very portable. 


Have I mentioned lately that I love the old machines? :-)