Showing posts with label Leaders/Enders. Show all posts

Thursday, 30 December 2021

Scrappy Brightness

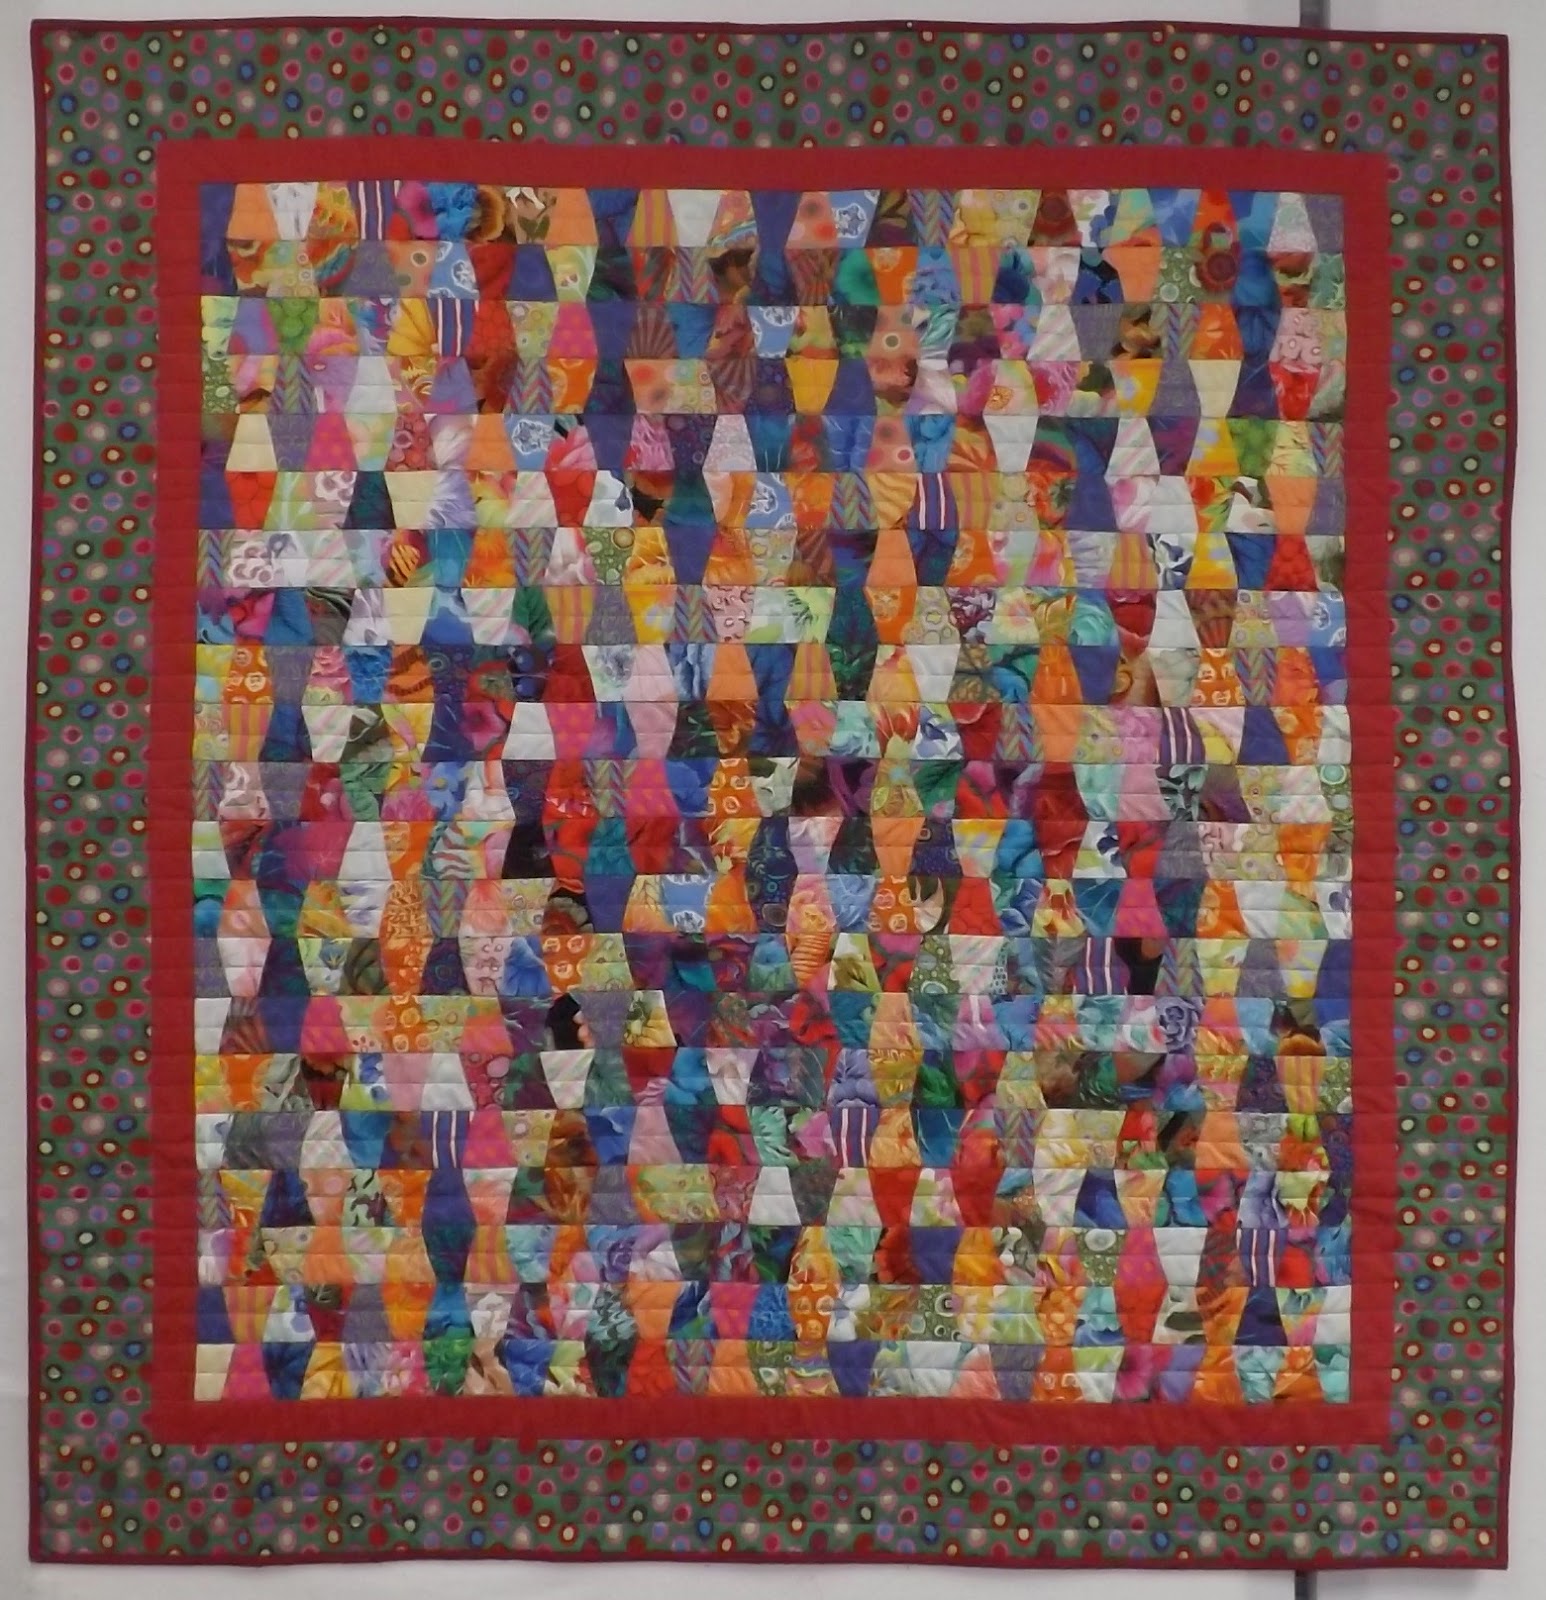
There were still a lot of Kaffe Fasset scraps in my bins everywhere so last summer I got them sorted into a couple of baskets and came across a photo of this quilt on the internet.  I had lots of 1 1/2" strips leftover from another project so I pieced them together and cut into 1 1/2" segments and sewed them as leaders/enders into rows.  At the end of the rows (left side), 2 1/2" squares are added and every second row more are added until 10 rows are complete and you start adding 4 1/2" squares.  It was a great way to use up lots of scraps, but I still have lots left!  I can easily start another quilt ☺! This turned out to be a riot of colour and really makes me happy!  It was beautifully quilted by my friend, Chris Bogart.

(Click on the photos for a larger view.)

The finished quilt

The 1" finished block corner

Label

Monday, 25 October 2021

Placemats

Our local small guild committed to making two placemats a month for our local VON for meals on wheels recipients for Christmas.  I used up some cut offs from a quilt which I made for my niece in 2013.  There were a lot of cut offs so I made flying geese units and pinwheel blocks with them as leaders/enders for quite awhile.  I then assembled them into placemats using up leftover strips from the quilt as well as some solid green.  The backings were done with some fall fabrics.  I was happy to get those leftovers used for something useful.


Saturday, 2 January 2021

Comfort Quilts

 Last February, my friend Mary Lou came over and we spent a whole day rooting around in my leaders/enders collection.  I've been sewing cut offs together for many years and it was time to get them all organized and sorted.  We had a fun day thinking of projects to make with these.  I found a bunch of sample blocks from classes that I taught way back in the early 2000's!  And these fabrics have been in my stash since the 80's and 90's!  With some small hst's (half square triangles) I managed to make up a few more blocks to finish off one of the rows and we used up lots of larger hst's to make pinwheel blocks.  This row quilt was the result.  I just quilted it with simple straight lines.   Satisfying to use it up!  It will go to our local hospital's chemo unit for a comfort quilt.

The finished quilt - the binding still needed to be sewn down by hand

one of the tiny hst blocks

The second tiny hst block

We also found a whole bunch of black and white HST blocks in our quilt group's stash.  The black part had little tiny paw prints on it.  I had a stack of four patches which I've made as leaders/enders over the years and they fit beautifully with the black and white squares to create this layout.  I found the dog print for the border.  Someone will love this one for a comfort quilt at the chemo unit.  Now I need to start sewing up four patches again!

Finished quilt
Close up of the dog print and paws.  I quilted this one with simple straight lines too.


Sunday, 7 January 2018

Lava Lamp scrap quilt

In October, I finished another quilt that was in the works for a number of years.  This quit was cut from scraps from my Diamond Quilt and Indian Orange Peel.  I got the tiny little EZ quilting ruler called Fat Cats from a quilt shop a few years ago (no affiliation...just so you can see what it looks like :-).  These little rulers are designed to use with 2 1/2" strips.  I cut lots of scraps up and divided them into cool colours and warm colours and sewed them together alternately as leaders/enders.  This produced an effect which remind me of those lava lamps which were the rage in the 1970's.  So, I'm calling this one my Lava Lamp quilt. (Click on the photos to enlarge.)

The finished quilt....sorry for the quality of this photo...the border is green (see next photo for better colours).
I just quilted straight lines in the ditch and halfway through each row
liking the lines across...I debated quilting in between each row, but decided to declare it finished :-)
Once all the rows were sewn, I arranged them on the wall and tried to work it out so no same fabrics touched

Friday, 7 November 2014

New Leaders/Enders Selvage project

I spent some time this week cutting 5" squares of white fabric for foundations for the basket weave selvage quilt in Karen Griska's book on Selvage Quilts.  I made the cube quilt in 2012 and had a lot of fun doing it.  I didn't have a leaders/enders project on the go right now and decided this one would work well.  So, my little tray is all ready to go and I have three squares finished and 40 white squares cut out.  I will need to cut more later as I'd like to make it into a larger quilt.  My selvage baskets (3 of them!!) don't look like they've had anything taken out of them at all.  I even threw a whole garbage can full of selvages away that are too skinny or flimsy or ugly!  The big problem is they get stirred up LOL. 

leaders/enders all organized :-)

Friday, 7 March 2014

Leaders/Enders progress

I've been working on a new leaders/enders project for a little while after finding these cool templates at a local quilt shop.  I spent some time over Christmas break cutting down all my scraps from my Diamond Quilt using the mini tumbler shaped template called Fat Cats and sorted them into warm and cool colours.   This is a bit of a challenge with Kaffe fabrics since many of them are mixed with both warm and cool!  I then sewed rows of 25 tumblers alternating warm and cool.  Here is the progress so far.

Twenty-one rows of 25 or 26 sewn together.  I am adding three more tumblers to the rows and it should turn out squarish.

Closeup of some of the tumblers.


It's always amazing to me how you much you can sew together between other projects! 

Tuesday, 3 January 2012

Progress.......and ripping :-(

In 2007, I finished my first Leaders/Enders quilt from Bonnie Hunter's website. I had so much fun doing these units that I started another one using beiges/creams and browns/greens. I also did other four patches in between. I've had more than 50 of them completed for quite awhile.

I use my trusty Singer 15-88 for most of my piecing and usually have a stack of 2" squares ready to use as leaders/enders:

I sorted out all the blocks and organized them this week and have 90 blocks finished. I think I have enough HST's and four patches ready to assemble the last 10 blocks. I may use this setting again, but will experiment with a few other ideas before putting the top together.

Progress is being impeded, however, with the discovery of 7 wrong blocks :-(. I will have to get my 'best friend', the stitch ripper out!

Meanwhile, I've been sewing a LOT of four patch blocks together and have quite a pile accumulated. I'd like to do a quilt with them, but can't come up with a brilliant idea? Set them on point with black squares and setting triangles? Putting them together as just four patches makes a checkerboard which isn't too exciting.


Wednesday, 18 August 2010

...why I sew on old machines

Gail and I got together yesterday morning to work on our braids for the local hospital's chemo unit. We are paired up with another member of the Elgin Piecemaker's Quilt Guild and we decide what we're going to do and then work on the project together. It's a great way to get to know another member of the group better and we accomplish something useful :-). Here are the braid pieces, all cut out and ready to sew:

I sewed the braids on my trusty Singer 15-88 treadle sewing machine. Have I mentioned lately that I LOVE this machine? :-)

First braid coming together:

Gail's first three braids at our second get together:


Yesterday, we trimmed the braids and sewed the pairs together and got started on the sashings and borders. Trimming was a great job to do together! I had to test a Featherweight that my husband had cleaned and serviced, so I "killed two birds with one stone" and did something productive while test sewing. This little Featherweight was made in 1934!! It purrs along so nicely and was a joy to stitch on!! While looking up some of the history of this older Featherweight in Nancy Johnson-Srebro's excellent book "Featherweight 221 - The Perfect Portable", I came across this paragraph:

"It's hard to believe some of the Featherweights purring away in sewing rooms and class are now old enough to qualify for social security, but there they are - proud of their Depression era birthdates and not only alive, but thriving. And they look as modern today as when Singer shipped them from its Edison, New Jersey, factory to a cautious public ready for the 1933 World's Fair.

"The Featherweight will probably never be reproduced as we know it. Even with today's advanced technology - investment casting of parts, and CNC (Computer Numeric Control) machining operations - the design and hand fitting involved in assembling this intricate, finely-crafted portable sewing machine would likely boost its unit cost too highly. This reality just reinforces its status as a classic; an example of craftsmanship that's fast disappearing in this modern world of plastics and throw-aways. This alone makes the Model 221 well worth owning whether you are a quilter, seamstress, or a collector of fine things that will probably be no more."

p. 131

....and that's why I sew on these wonderful old machines :-).


Check out the stack of 2" squares that I was using as leaders/enders while sewing the sashings and borders onto my quilt :-):

And, here is the finished quilt top (the colours are a little off in this photo...the border is a blue with brownish/plum motifs):

The quilt top is actually square :-)...I was not exactly in the center when taking the photo..hey, I'm a quilter, not a photographer LOL.

Monday, 1 February 2010

The pile is growing!

I've been piecing several baby quilts lately and my leaders/enders blocks have been taking shape! I sorted out all my four patches and half square triangles and decided to put them all together first before making more four patches.

I now have 62 of these blocks finished. I need 100 to make the quilt top I'm planning. Amazing that a quilt is being pieced while I'm working on other projects :-).


Sunday, 3 January 2010

Stash Management

Comments on yesterday's post about the leaders/enders quilt got me thinking of posting a few pictures of how I organize my leftover fabric strips. Whenever I am finished a quilt, I cut the small leftover fabric into 2 1/2" or 2" (or smaller) strips and put them in the appropriate drawer. I used Bonnie Hunter's suggestions for sizes that work well in scrappy quilts. I look at yard sales for these drawer units and use them for all kinds of things. My cutting table is actually two kitchen tables which we also picked up at yard sales a few weeks apart for $5.00 and $2.00 :-). DH, Jake, made square 'risers' and drilled holes in it exactly the size of the table legs to make the cutting surface at a comfortable height. I now have a 60" square table for cutting and pinning. I have these drawer units under the table all around and store tools, thread and supplies on one side and projects that I have on the go in other drawers. Here is the side that stores the 'homemade' jelly rolls :-).

The first bank of drawers has 2" squares, 2 1/2" squares, 2" strips, 2 1/2" strips and 3 1/2" strips:

The second bank of drawers has strings, 1" strips, 1 1/2" strips (I'm working on a scrappy log cabin with these) and leftover binding pieces:

It takes a little work to get this set up and get into the habit of putting things into these drawers, but after awhile it gets to be second nature. And, the best part is that when I need something, it's right there.

Saturday, 2 January 2010

Leaders - Enders

I've been using leaders/enders for a few years which I learned from Bonnie Hunter's fun site. I started with the quilt which she made under her instructions on her website for leaders/enders and made a blue and white quilt using scraps collected from years and years of sewing. Here is a picture of the first quilt I made:

I loved these units for leaders/enders so kept on cutting using beige and green scraps this time. Here is my trusty Singer 15-88 treadle with lots of beige and green 2" squares for the 4 patch units:


I organized my disaster in the plastic tub where I keep this project and pressed all the 4 patches and half square triangles that I had completed.


I have 44 blocks completed (the blue and white quilt used 100). By the time I have all the subunits put together I'll probably have at least 50 blocks, so I'm halfway:


This strip is leftover from my curved log cabin quilt's piano key border and the star is made from the cut offs from a 12" block I made for a guild project years ago :-). I've kept both these items in the bucket and hope to incorporate them somewhere in the finished quilt..kind of a cool, unexpected surprise somewhere. It'll be sometime before I get to laying this quilt out :-).

Found another picture on my computer of some of the green and beige squares up on my design wall. I forgot I had this picture :-). This is the same layout as the blue and white quilt, but I think I'm going to do something different with the layout for the green and cream/brown quilt.


Saturday, 11 August 2007

Josh and Janneke's quilt

Today was my nephew Josh's wedding to Janneke. The wedding was very nice and the weather was perfect! This is the quilt that I made for their wedding gift. It was so much fun to make. The pattern comes from Bonnie Hunter's www.quiltville.com site. It is from the leaders/enders section. I started it in February of 2005, cutting out blue and white or cream 2" squares and pairing them together into four patches. I also cut triangle squares from 3 1/2" strips of whites/creams and blues as per the instructions on Bonnie's page. I used those pieces as leaders/enders (or thread pads as I was taught :-) for several months. I put them together into a 60" square quilt and then added 2 1/2" blue borders to frame it. I had a lot of fun quilting feathers into the light diagonals with light blue variegated King Tut thread. I quilted leaves into the border. By this time, I had done a lot of leaves and got brave enough to use contrasting thread on the blue borders! Actually, I was too lazy to look for darker blue thread :-). I was very happy with the way it turned out. Here is the completed quilt:

A closeup of the border and feather quilting:

The Feathers:

The center of the quilt:

The label:

Amazing what can be accomplished while you're working on other quilts! Thanks so much Bonnie for the wonderful inspiration!! I loved this quilt so much that I almost didn't want to give it away...solution? Start another leader/ender quilt in blue and white! Again, it is pieced and quilted on my trusty 15-88 Singer Centennial treadle made in 1951 in Canada. Did I ever mention that I LOVE this machine? :-)